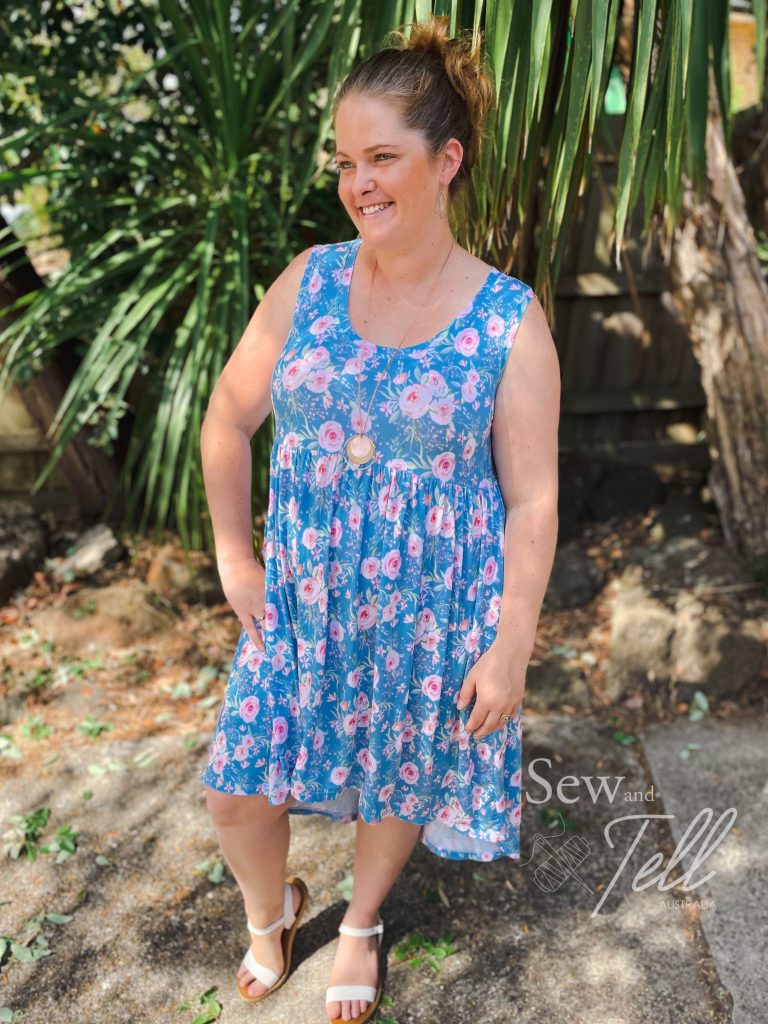
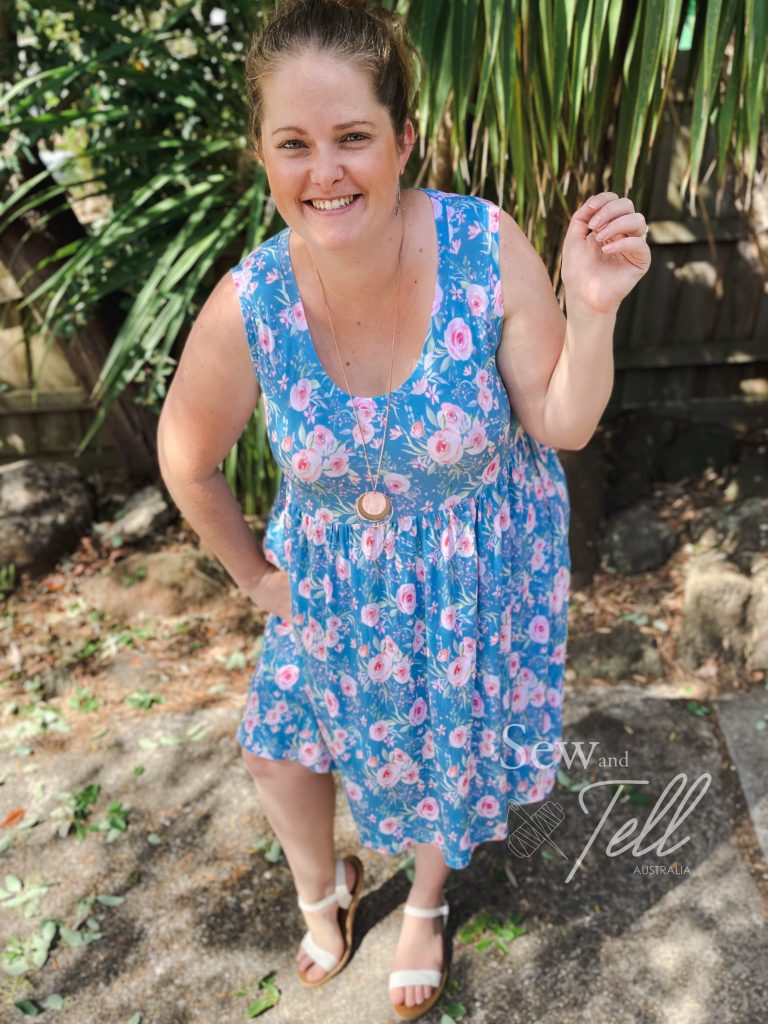
Pattern: Lily Dress & Top Designer: Sonia Estep Designs Fabrics: Bamboo Lycra Measurements: Bust: 44″; Waist: 38″; Hips: 49″ Size made: 18 graded to 20 hips Adjustments: Grading between sizes Pros: I LOVE this dress. I specifically love the hi-lo hemline, it just makes me feel so pretty and summery. The empire waistline is also a plus Cons: Not really any cons for me on this one, I love it all
I absolutely love everything about this dress. From the scoop neckline, the pockets to the hi-lo hemline, this dress is super flattering and I feel like a million dollars in it.
I got the bamboo lycra in a Clover & Co preorder as I loved the design and already had it in purple, so when it came up as a blue colour way, I HAD to have it. I also really like the bamboo lycra as it is a natural fibre that breathes better than say a double brushed poly which can get quite hot.
One of the things that impressed me about this pattern was the option between 2 waistlines. Empire or natural. Empire tends to hit just under your bust line and is a little more flattering for those with a bit of a tummy. Natural sits lower and can sometimes accentuate features you’d rather not have highlighted. As I have slightly larger breasts, an empire waistline will over skim over my bust and flair out straight below, helping to hide my tummy.
I also loved the scoop neckline which I’ve mentioned before suits my body type, and pockets. Well, what can I say about pockets?! They explain themselves haha.
The last thing that I really love is the hi-lo hemline. I just think it adds something a little different and feels nice when you’re walking along.
This was a really simple dress to put together and there is also the option of a straight gathered maxi skirt, peplum length and a button placket. I was going to do the button placket but decided against it. I may look at it for the next one, cause let me tell you, there will be a next one for sure!
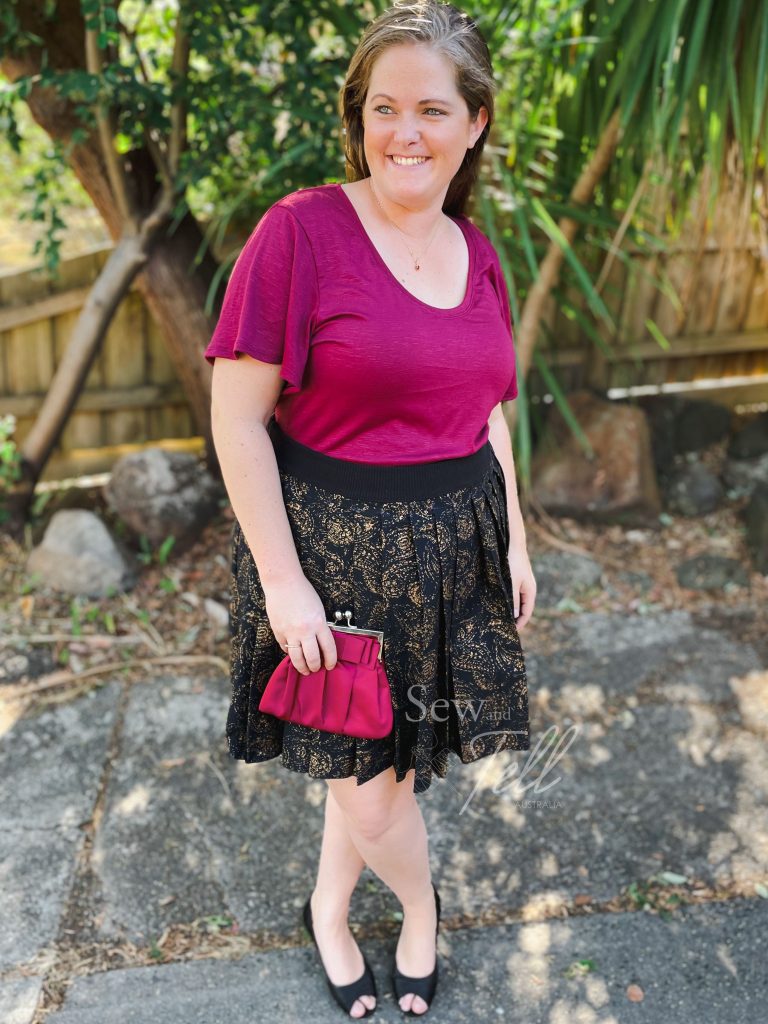
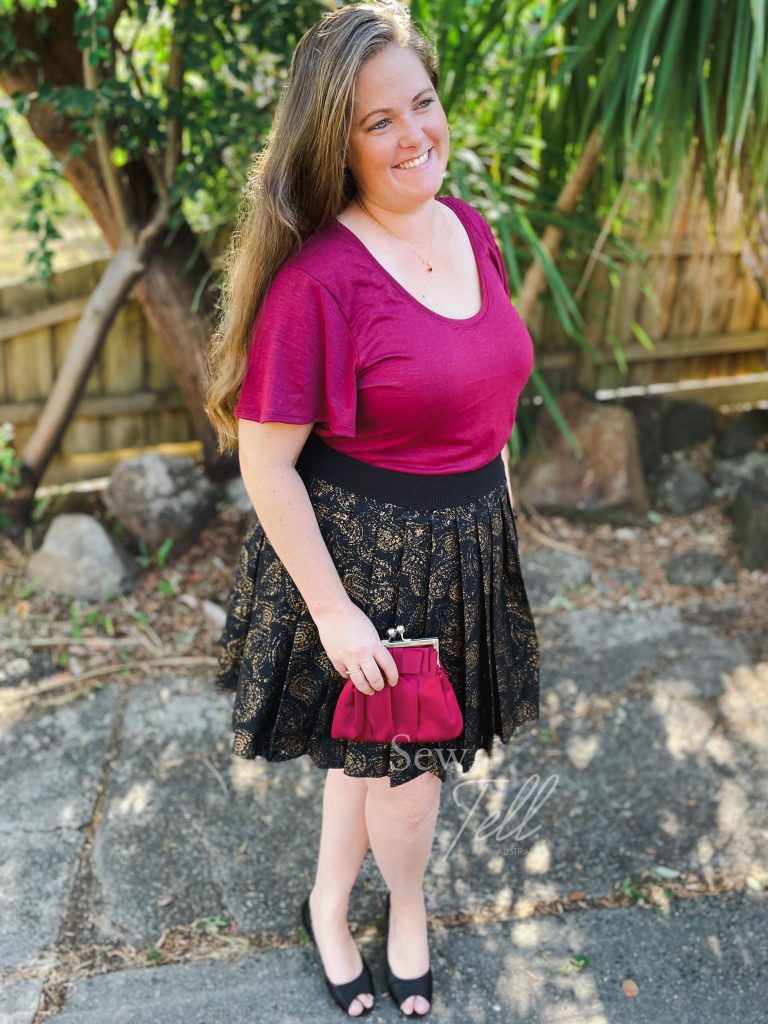
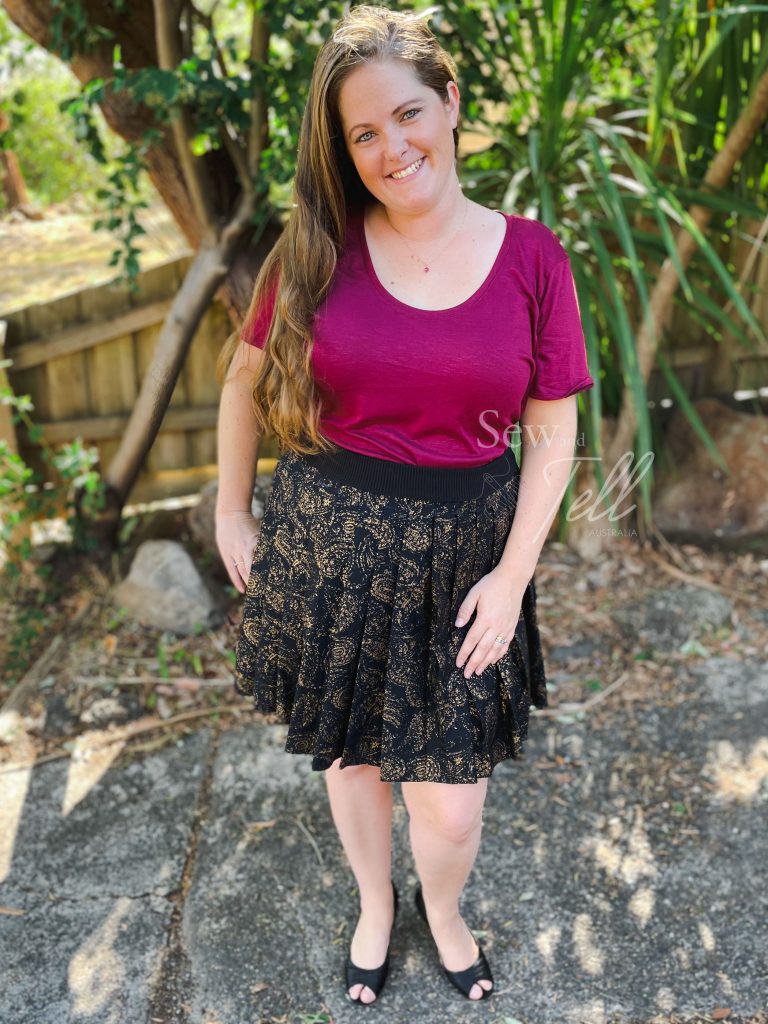
Pattern: High Waisted Pleated Skirt Designer: Ellie & Mac Patterns Fabrics: Woven Cotton Poplin & black ribbing Measurements: Waist: 39″; Hips: 49″ Size made: 2XL Adjustments: None Pros: I like the dressiness of this skirt and how by changing the fabric could really change up wether you are making it dressy or casual. Cons: There is a lot of work in this one with the pleats. I wouldn’t say its difficult, its just finicky and time consuming.
This pattern went through a couple of changes through the testing process, which is partly what the test process is, to iron any kinks in the size grading and instructions.
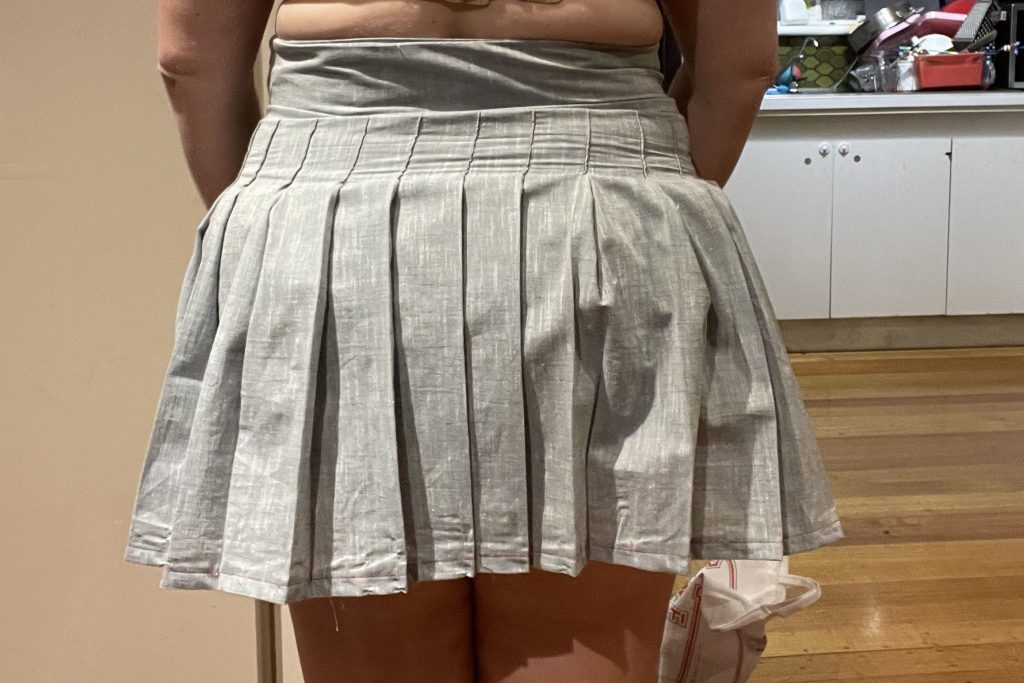
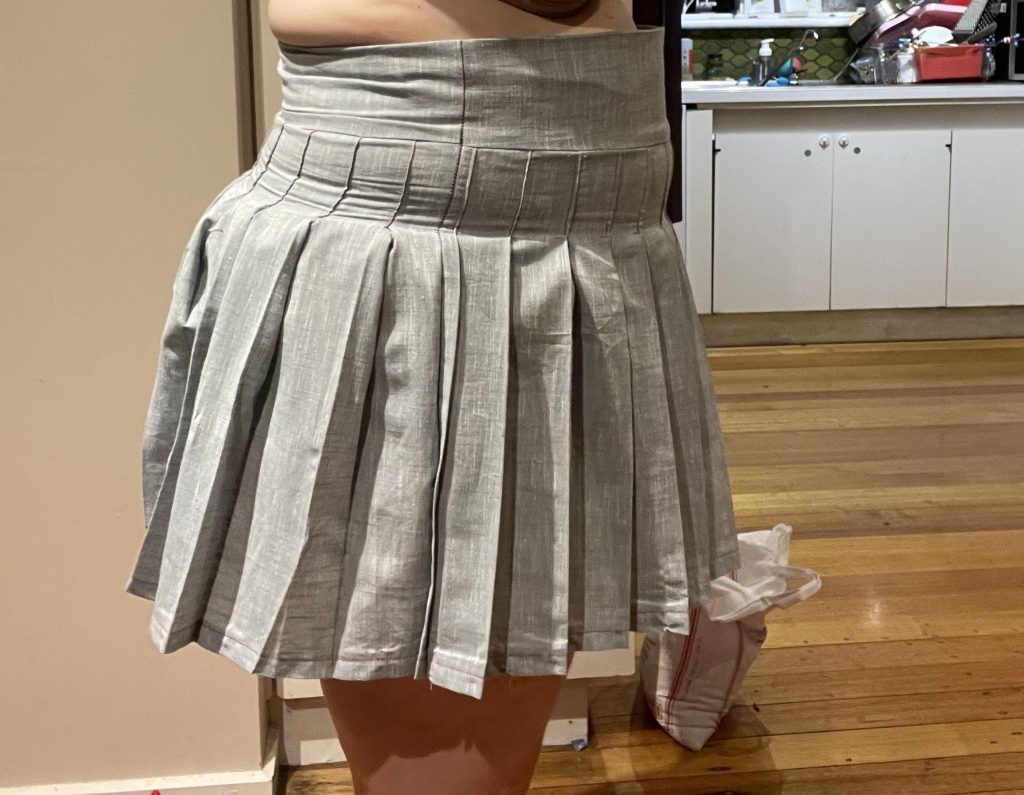
The original skirt was to made from knit fabric, but the first test group had issues, so when it got to my group for testing, it had changed to a woven or structured knit. I had a lot of trouble with my fit version, which I think was partly to do with the style (the pleats were sewn down a lot further creating less room in the hips) and I also think I didn’t sew the right size for me.
The original test fit garment
It bunched at the hips and non contoured waistband sat funny on my waist. It was not a flattering look! I was a little scared to see what the final version would come out as, but a few additional changes were made and I think they made a big difference. The main difference was incorporating the option for a ribbed waistband option to help with the waistband issues.
I had initially picked out some cute grapefruit fabric to make my final from, but pleated skirts are incredibly fabric hungry and I didn’t have enough. I did however have some stylish black and gold cotton poplin that I got from a friend who was de-stashing and it was perfect.
While pleats are time consuming, I actually find it quite cathartic and satisfying watching them come together. It’s ‘slow’ sewing, but requires more skill and attention to detail, which I think is good to have a few of those projects every now and then. Especially if you’re a fast and dirty sewer like I am haha.
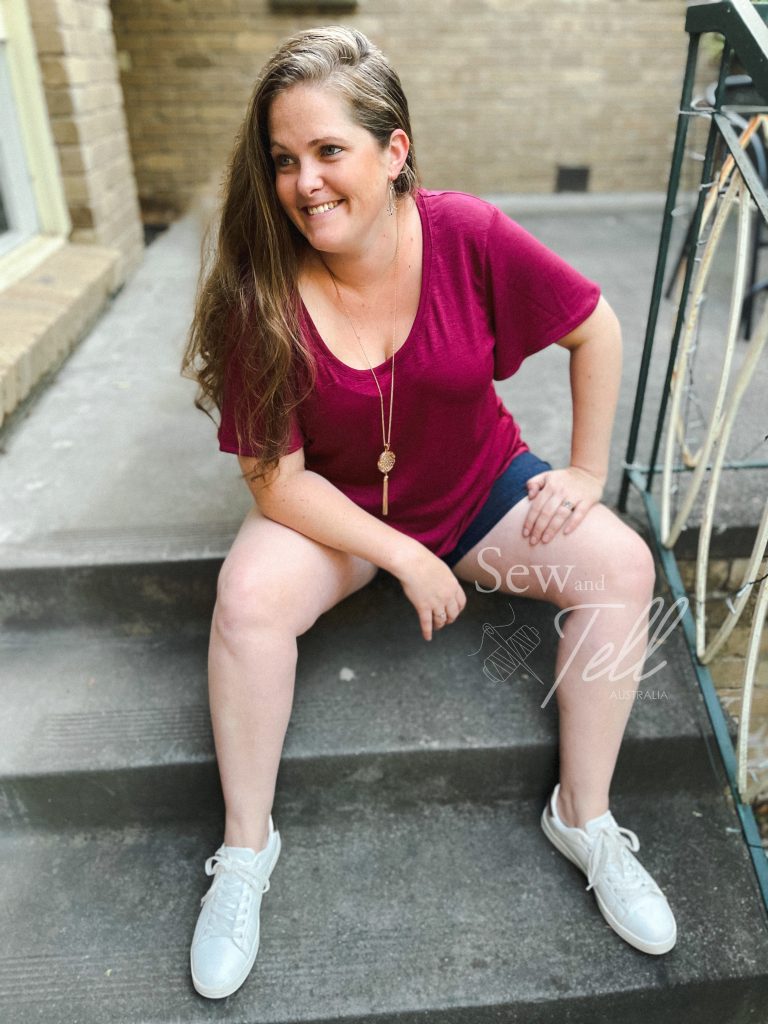
I think the final skirt came up quite good and when I paired it with my new Tennessee Tee in a deep red/Burgundy, it really popped. Throw in a pair of black kitten heels and I was already for my Valentines date of salmon and rice with my husband and kids at 5.30 before I ran off to work haha. Glamorous Valentines for us for sure 😉
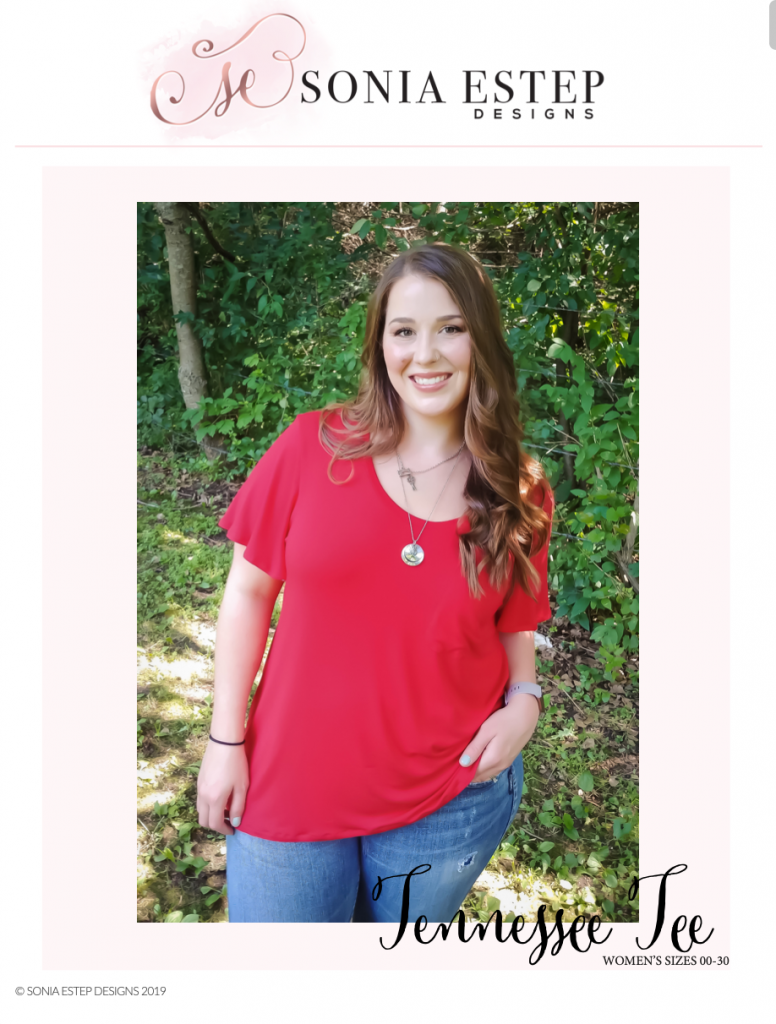
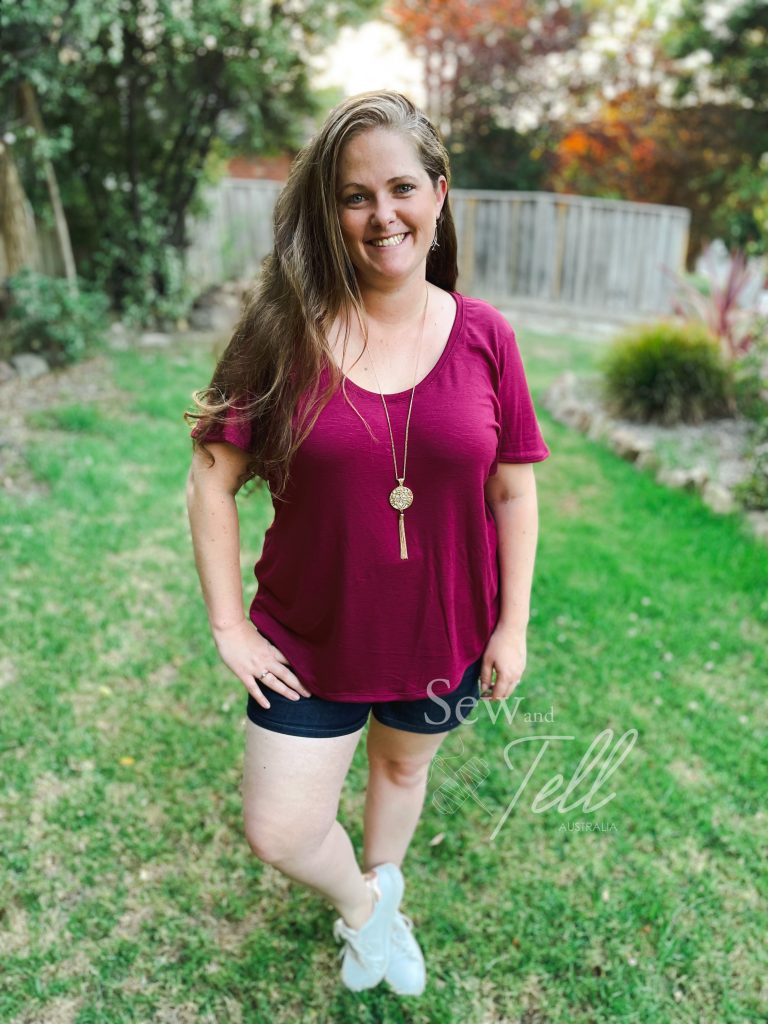
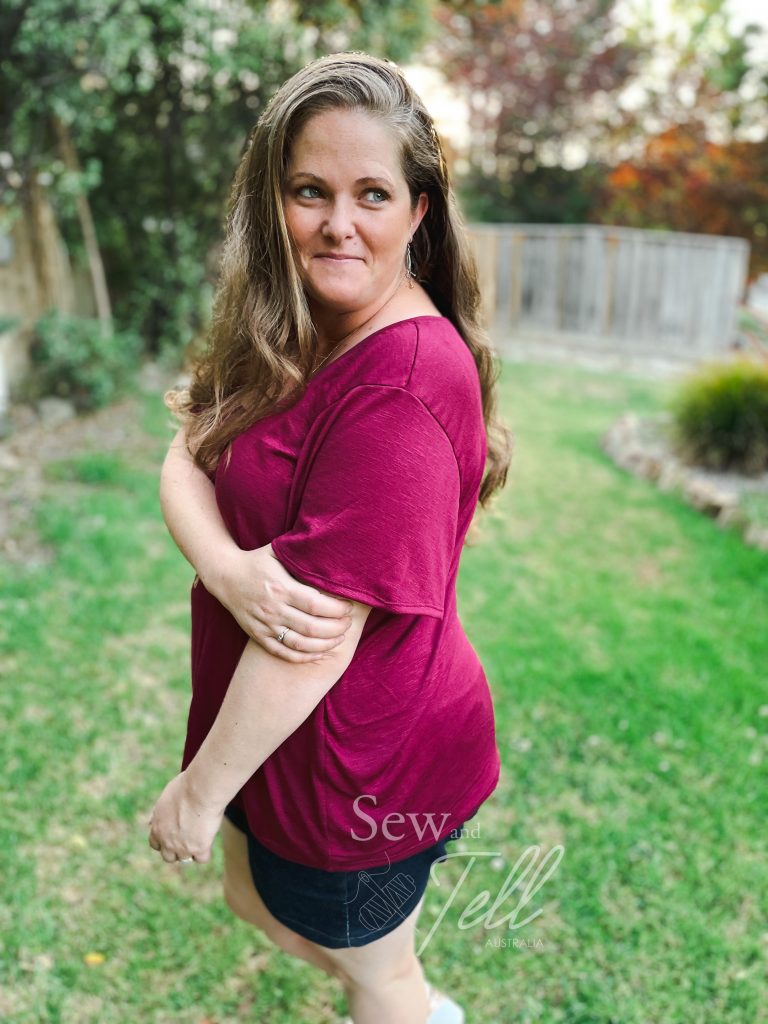
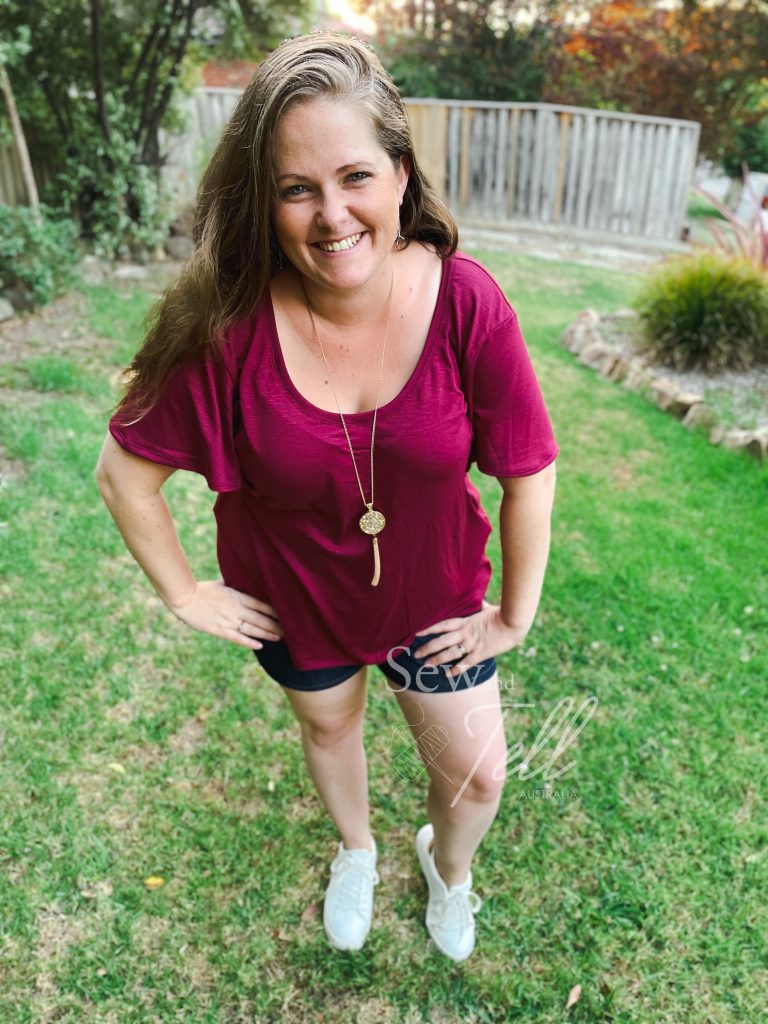
Pattern: Tennessee Tee Designer: Sonia Estep Designs Fabrics: Viscose Slub – Lush Fabrics Measurements: Bust: 45″; Waist: 39″; Hips: 48″ Size made: 18 graded to 20 hips Adjustments: Grading between sizes Pros: I really love the relaxed style of this and the flutter sleeves. Cons: I think I’ll make a size 16 and grade out to a 20 next time, its quite big up top for me.
I was asked to sew this one up as part of Sonia Estep Designs Hello Monday promotion, and I can see it fast becoming one of my go to tee patterns.
Relaxed fits are generally my style, so this suits me perfect. However it does seem to have quite a fair bit of ease built in, so I think I will size down in the next one I make. Possibly a size 16 up top graded to a 20 at my hips.
I have had this Burgundy/Red Wine Viscose Slub from Lush fabrics Australia in my stash for a while with a tee pattern make in mind and I can say I think it was the perfect pairing. I have realised I am not a huge fan of polyester fabrics in general as I get quite hot in them, but being a roomy style, it isn’t too bad. The drape works really well with the flutter sleeves and I tend to favour scoop necklines as it compliments my décolletage.
I would highly recommend grabbing this to add to your basics collection, especially while its on sale Monday 14th February 2022.
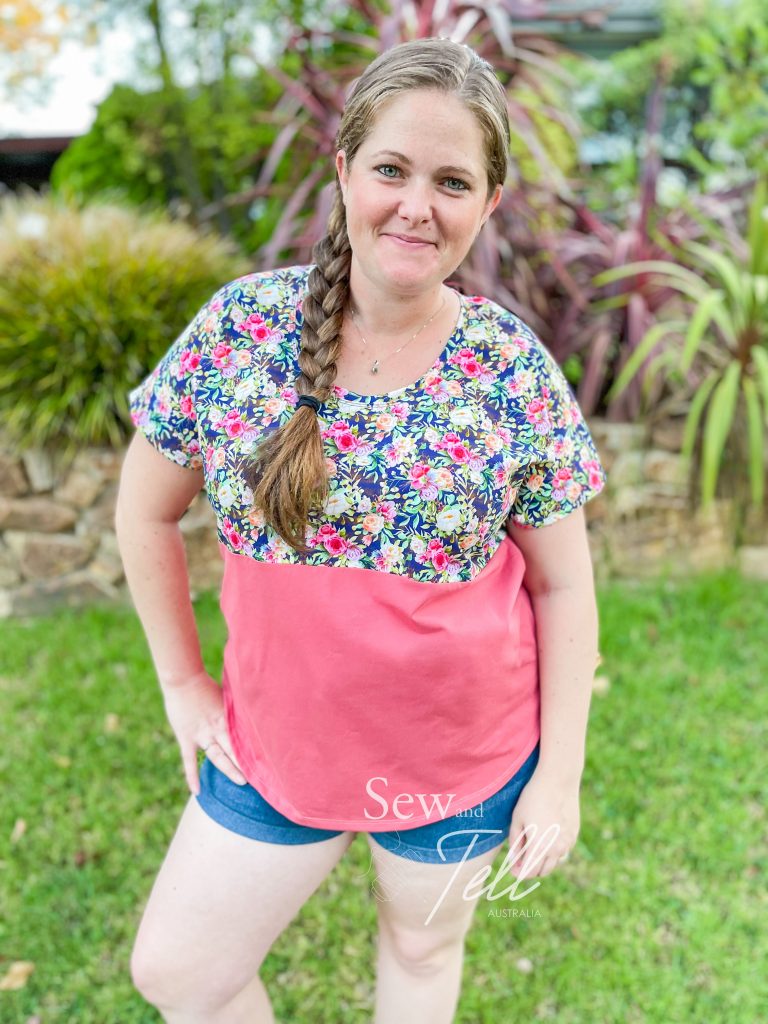
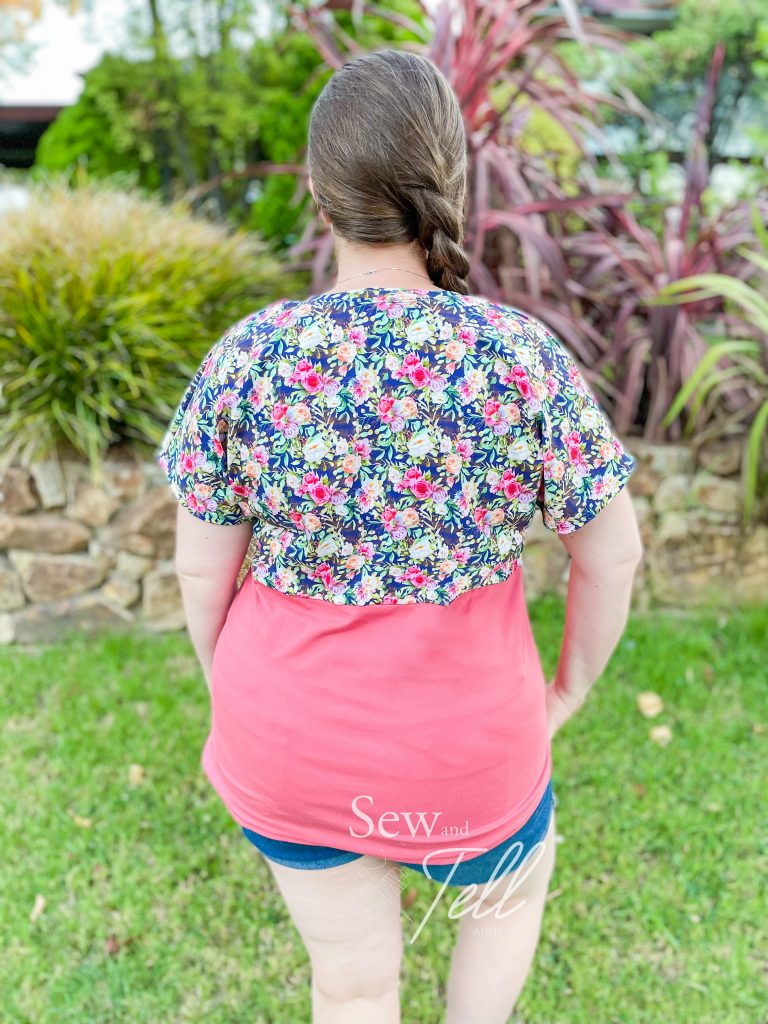
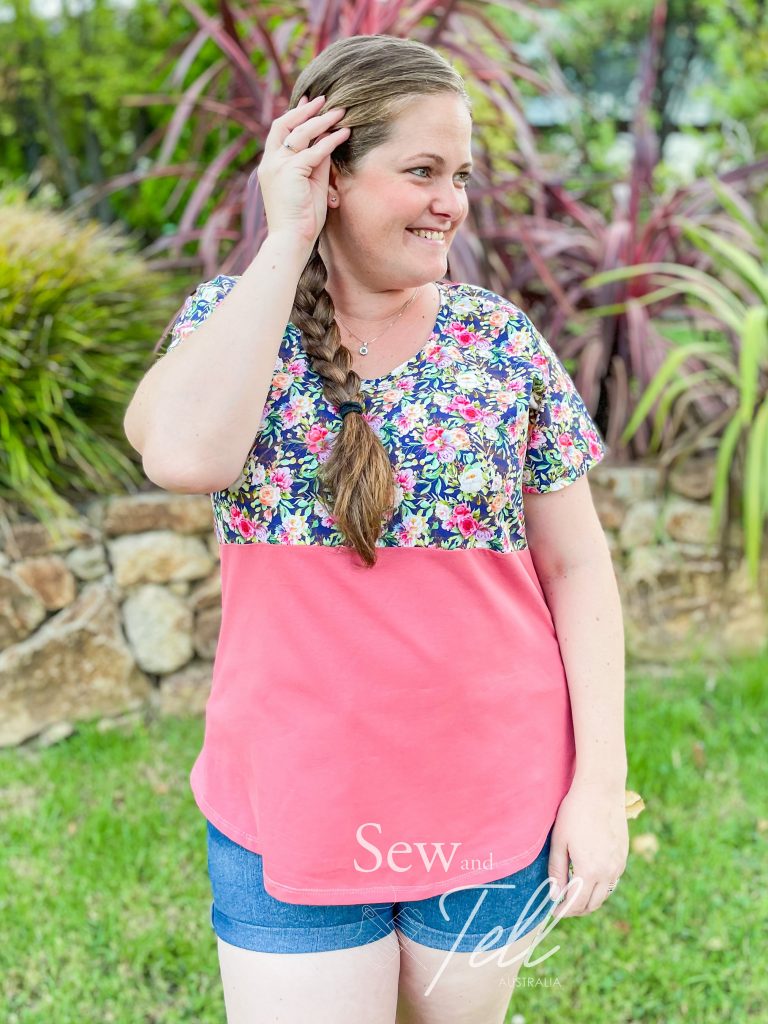
Pattern: Womens Domino Dolman Tee Designer: Peek a Boo Pattern Shop Fabrics: Accent fabric – Fabric By Missy Rose, Solid – Sew Unique Fabrics Measurements: Bust: 45″; Waist: 39″; Hips: 48″ Size made: 2X Adjustments: Took the sides in a little as it was very roomy Pros: Such a quick sew! and I love the different colour block options. Nursing Friendly as well Cons: It was very roomy in the 2X, I would normally make the XL, so will size down for my next one.
When Amy from Peek a Boo Pattern Shop put the tester call out for this one, I applied straight away. I love a Dolman tee, and the options for this one in terms of colour blocking were super appealing to me.
According to my measurements I fell in the 2X size category, which I made, but to be honest I felt this pattern had quite a lot of ease so it felt very roomy to me. I ended up taking the sides in about an inch on either side which worked well.
It is an incredibly quick pattern to put together, especially with the dolman style sleeve. I can definitely see a few more in my future, it is a great way to mix and match solids and accent fabrics. Also a good way to use up smaller cuts of fabric on the top colour block.
A great essential tee to have in your pattern collection.
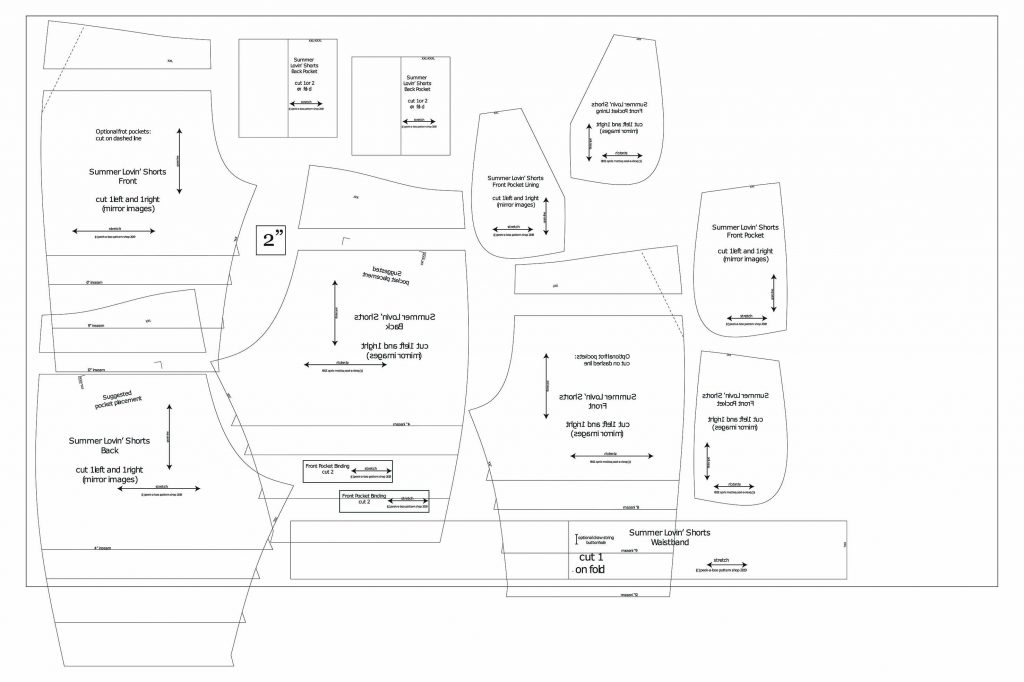
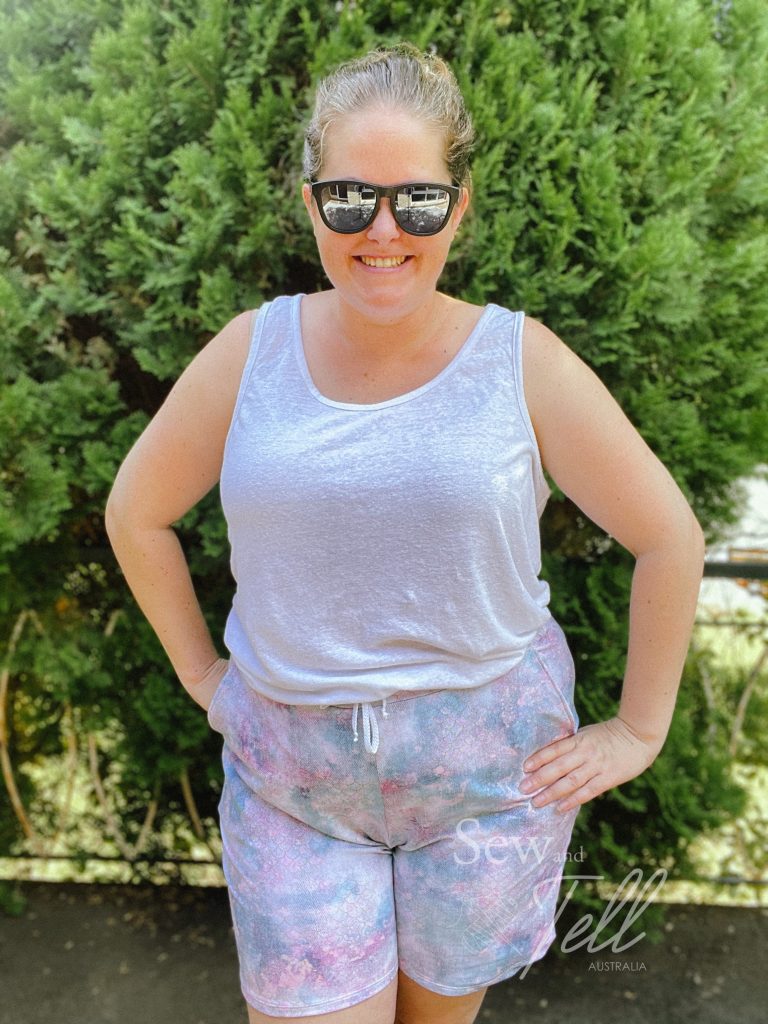
Pattern: Summer Lovin’ Shorts Designer: Peek a Boo Pattern Shop Fabrics: French Terry from Sew Unique Fabrics Measurements: Waist: 39″; Hips: 47″ Size made: XXL Adjustments: Adjusted the front and back rise by 1.5″ Pros: Very easy pattern and super comfortable. Perfect for, as the title suggests, summer shorts 🙂 Cons: No real cons, but a little size restrictive, it tops out at a XXXL. Hopefully they will revisit it to size up at some point.
After my recent success at seemingly cracking the code to my body for pants fitting, I was eager to try some other shorts and these seemed like the perfect comfy, loose summer shorts. I’ve also not made shorts from French Terry before but they are delicious! So soft and comfy.
The construction of these came together incredibly quickly which is always a bonus. If you are an experienced sewer, you should be able to put them together pretty much without looking at the instructions at all. The pockets are simple as are the back patch pockets. I originally cut the back pockets out but during construction I decided I didn’t want them anymore.
This was also the first time I used the program Inkscape to digitally make alterations to my pattern. It was incredibly helpful at playing ‘Pattern Tetris’ as well before I got to cutting. It was a bit of a bug bear of mine that I couldn’t lay out my fabric and place all my pieces down to try and get the most out of my fabric before cutting, but now that I am getting a better understanding of Inkscape, I will be able to do that again.
It is hard for me to learn a new program like this as I am a graphic Designer by trade and Adobe programs are my bread and butter. However, because I have fallen so hard for projector sewing, investing the time to watch YouTube videos on basic functions and how to utilise it is definitely worth it.
Patten tetris, digital style
So I was able to add the 1.5″ to both rises in Inkscape fairly easily, my next challenge will be to do a Full Bust Adjustment in it. I think thats a while off though, I need to watch a bit more first. If anyone has any YouTube videos to suggest, feel free to comment them below or email me at sewandtellau@gmail.com
Now excuse me while I go make allllll the pants and shorts 🙌🏼
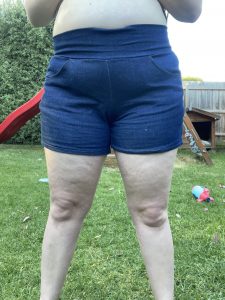
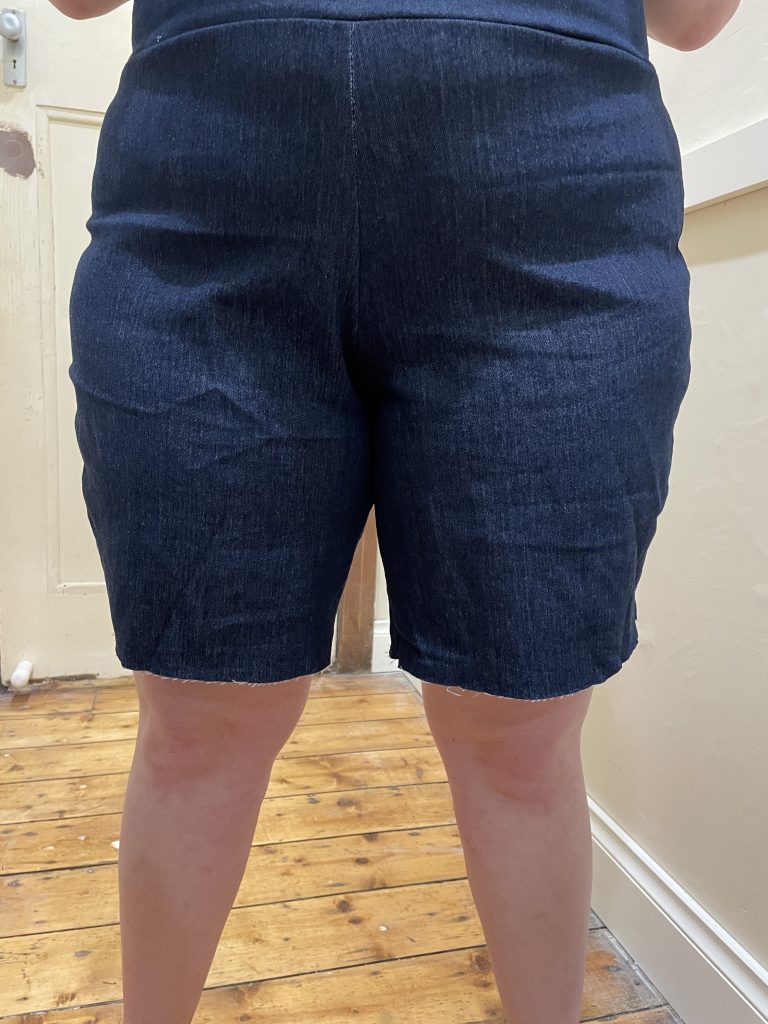
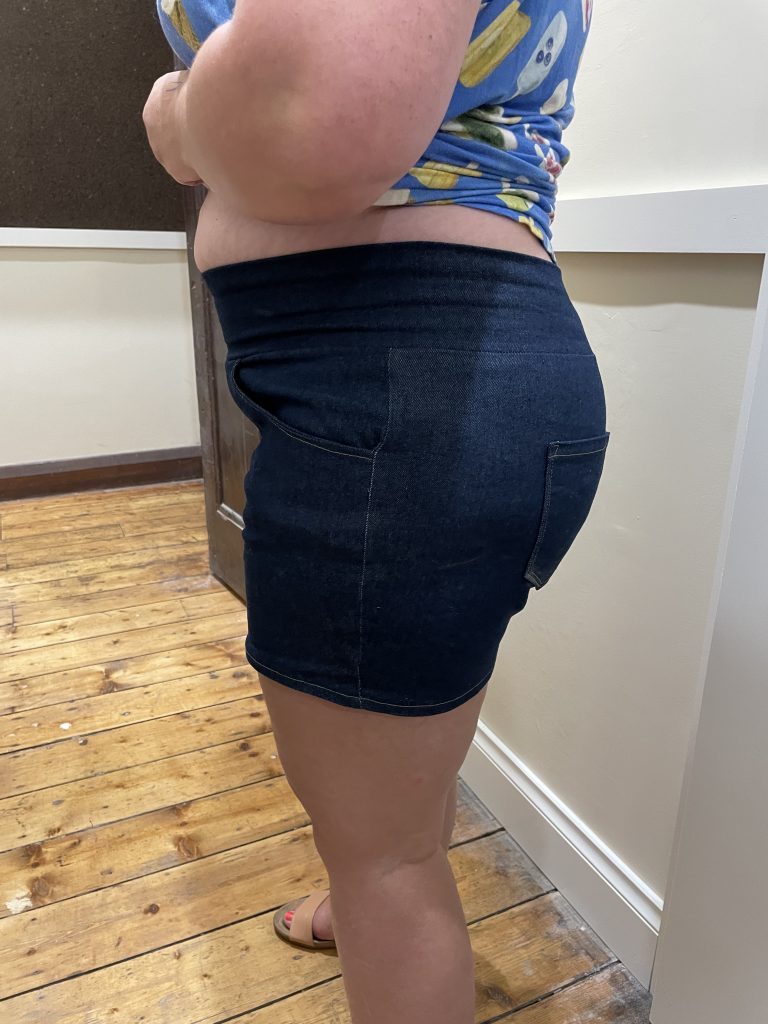
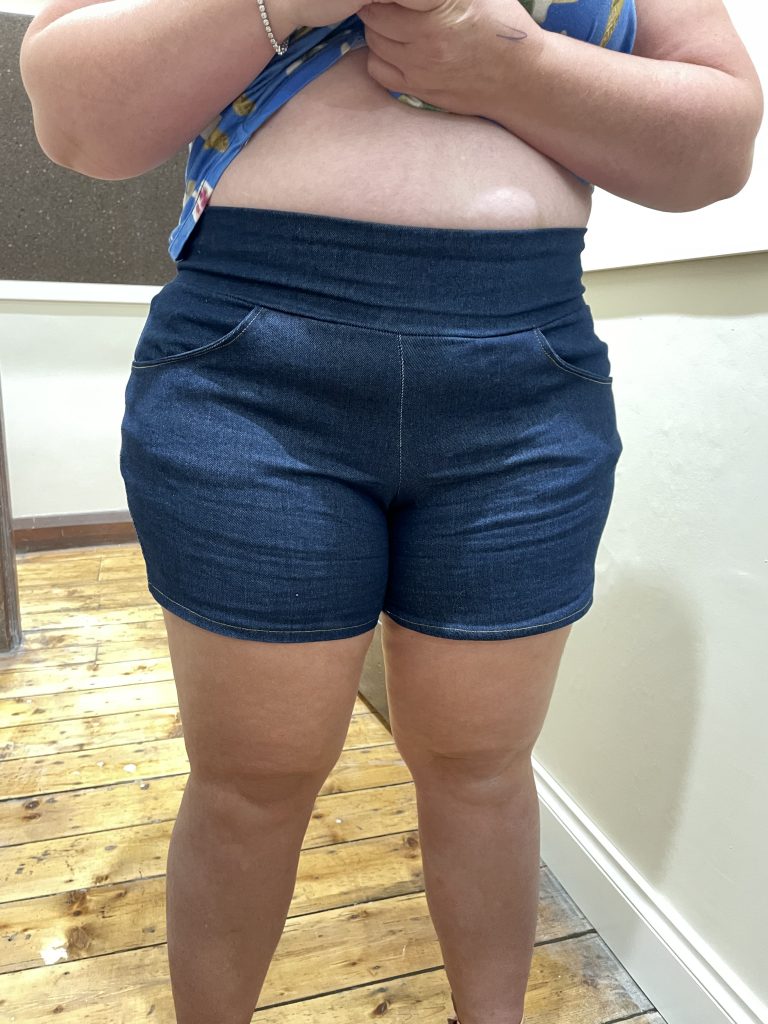
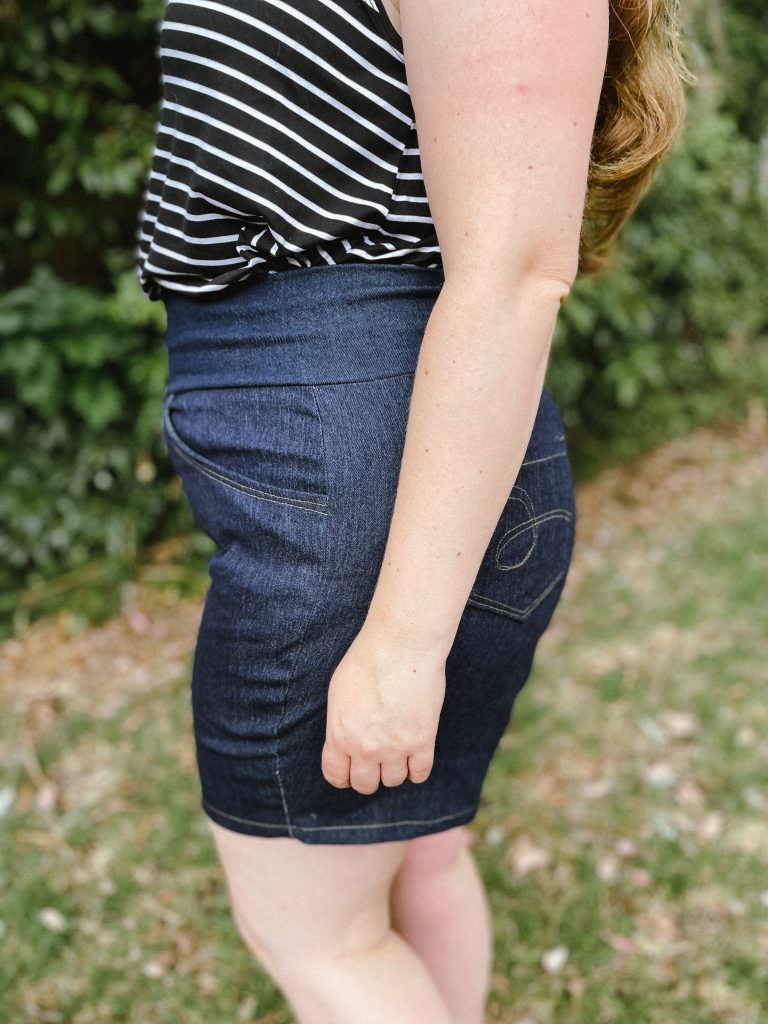
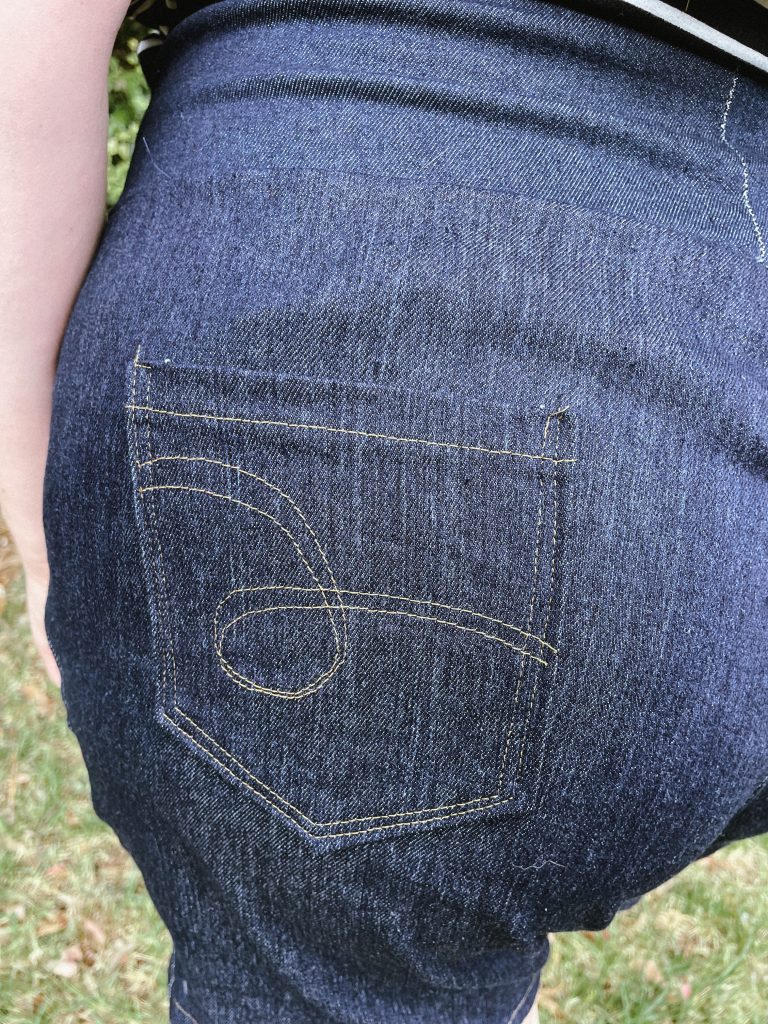
Pattern: Iris Shorts Designer: Sonia Estep Designs Fabrics: Stretch Denim from Spotlight Measurements: Waist: 39″; Hips: 47″ Size made: Straight 20 Adjustments: Adjusted the front and back rise by 1.5″; added 1/4 inch to crotch curve; added 1″ to the high rise waistband Pros: I am a big fan of pull on jean shorts and these fit the bill perfect. Very easy construction. Cons: As with all pants/shorts patterns I had no end of trouble fitting them, BUT I think I’ve worked out my body now and how to quickly fit pants going forward! So not a con of the pattern itself, just my body challenges.
Strap yourself in for this read, it’s going to be a long one!
I have had issues with pants/shorts since forever. I make them and they never fit right. It was so disheartening and honestly made me question my ability as a sewist. How can I sew the most complicated of tops, dresses and skirts and they look great, but pants? No deal. Every pair I made were ill fitting, clung to every lump and bump and half the time felt like my crotch was trying to eat the fabric.
I have had the Iris shorts on my list to try for a while but was very afraid due to my aforementioned fit issues. However, I decided the time was right to try again and this time I enlisted the help of my good friend and sewing teacher, Annette.
First I did my usual measuring, and decided from my measurements that I would be best with a size 20 waist and grade down to an 18. I cut them out and sewed them up with quiet confidence, THIS pair were going to fit…
My first ill fitting pair
Spoiler alert, they didn’t.
BUT, I did learn a tonne from this pair. I bought the book ‘Ahead of the Curve’ by Jenny Rushmore from Cashmerette and from looking through her fit pics, I determined that I needed to do something with the crotch, and possibly the back crotch.
So I set about making a second pair, this time FaceTiming Annette talking through my changes I wanted to make. I chose to add 1/2 an inch to both crotch curves and I scooped out both a little as well. After cutting these I eagerly sewed them up, this time they were going to be perfect.
Second pair, my bum was eating the farbic
Sequel spoiler, they still weren’t.
By this stage I’m slowing loosing the will to dress my lower half. I really couldn’t understand what I was doing wrong. I sent fit pics to Annette again, we discussed what could be going on and decided I would bring them to our kids tennis lesson the next day to see what I needed to do. I must say, it was a bit of a giggle to sit there surrounded by other parents, shoving food in the 1yos face while the 5yo plays tennis, pouring over a pair of pants drawing on them to see what changes needed making.
Annette gave a few suggestions for me to go home and try, but to be honest, I was a little done. I needed a pants break so I put them aside for about 3 weeks.
Eventually, Annette and I were due to meet up. After shelving them for a few weeks, I thought it was time to get them out and get her to help me in person. Giving her the chance to check fit problems on my body.
Once she was able to assess them on me in person, we talked about how we needed to raise the rise in both front and back. I have an Apron Tummy or Pannus Stomach, which everything I read about said I may need to make the crotch curve more of a J, but Annette advised against playing with the crotch too much if possible. In the end we settled on making a straight size 20 and adding 1.5 inches to both the front and back rises.
I cut the new pieces out with no real gusto. Third time lucky right, but I didn’t want to get my hopes up.
Well, after I basted them quickly together, just to get an idea of fit, they were near enough PERFECT!
As soon as I put them on we could see so many of the issues in the previous 2 pairs were eliminated. No smiling lines, no crotch and butt eating my fabric, no clinging to my apron accentuating the bulge. It all just skimmed over everything and fit just beautifully. I could have kissed Annette I was so happy!
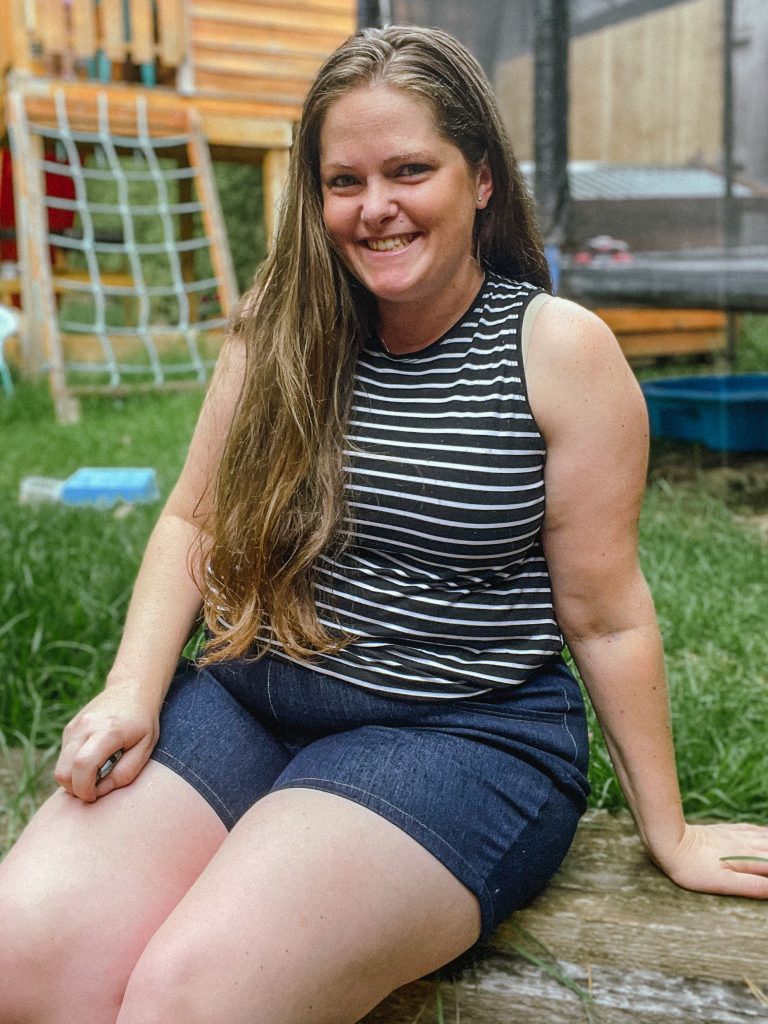
Final pair that fit perfect!
So, what next?
Now that I appear to have ‘cracked’ the code to my body, I am going to try adding 1.5″ in the rise to all my pants going forward and see how that goes. I am also ready to try the Love Notions Glissando Shorts again I love this pattern and refuse to be beaten.
I’d also like to point out a few things about fit.
I asked Annette to try these shorts on, which she did. They fit her SO MUCH better. Like so much better. I asked if she would mind comparing measurements, which she didn’t. I’ll list them in a table to help visuliase
Annette
Megan
Bust – 45″
Bust – 45″
Under Bust – 39.5″
Under Bust – 36″
Waist – 40″
Waist – 39″
Hips – 51″
Hips – 47″
Height – 5’2
Height – 5’5
Torso – 16.5″
Torso – 19.5″
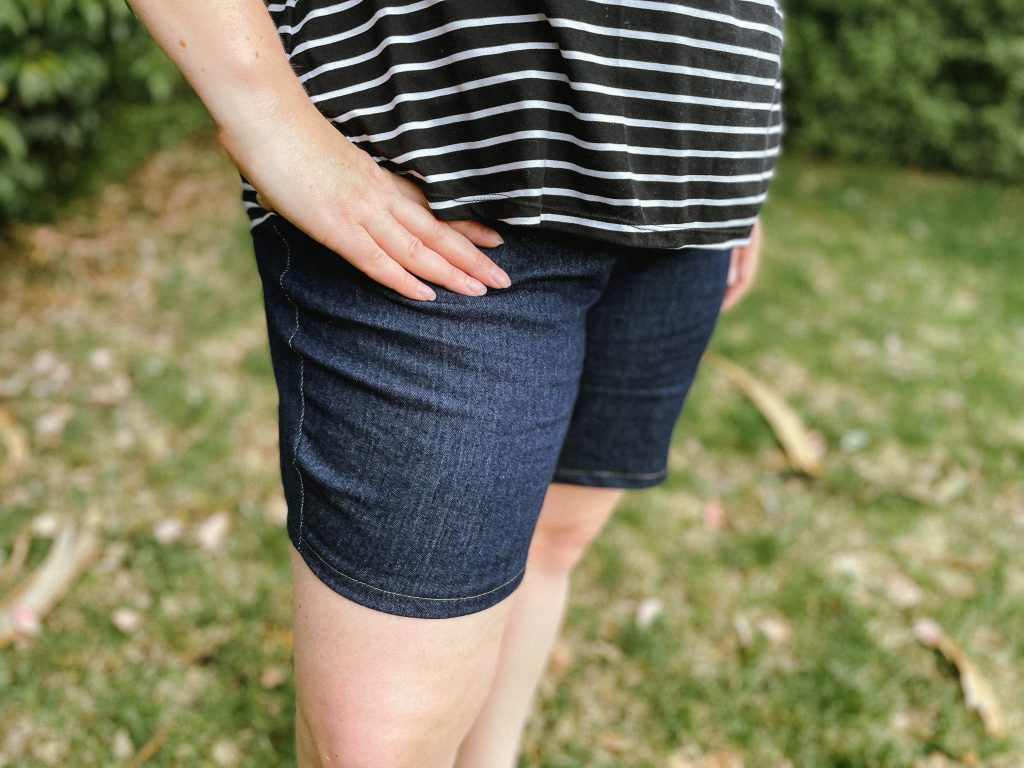
As you can see from above, we both have the same bust size, but I have larger breasts. Meaning most of the time I need to do a Full Bust Adjustment and Annette never does. We also are very similar in the waist, but different in hips, however I carry all my weight in my tummy and Annette’s is more focused on her bum and thighs. So while I had to size up and add height to the rise, Annette was fine the way it was as she didn’t have her tummy altering where the waistband sat. Her torso is also shorter as she is shorter than me which effected where the waistband sat on her. It never ceases to amaze me how measurements can be very similar, yet have such drastic differences on a body. I happily gifted my first pair of shorts to her as they looked so great on her and I didn’t want them to go to waste.
They fit so much nicer on Annette
I guess the moral to my long pants tale is, never give up and invest some time and energy into reading about fitting and if you can, get yourself some lessons with an experienced sewist who can help nut out your fit issues. Lots of pattern companies have free fit tutorials so spend some time really looking at where the pants are not feeling good for you and what it could mean. Also try not to be discouraged. Keep trying till you find your perfect fit, but don’t put a timeline on it. I was frustrated I couldn’t work it out in a day, it’s taken me a year, but really, fitting is only learnt with time and patience.
Month one done! No rejects this month so I’m off to a good start
Week 1: Sewing Space
The first week was to clean or make something for your sewing space. My sewing space was a bomb site so I got in there and tidied it up! It’s already messy again, but it stayed clean for a day, ish. haha
Week 1: Sewing Space
Week 2: Staples
Week 2 was about making an item that is an essential item in your wardrobe. I chose to make the Stitch Upon a Time Wylde Dress/top with this gorgeous fabric from Sew Unique Fabrics.
I wear a lot of tops, so this was definitely an essential for me
I pattern tested this cute little bag from Sunflower Seams Patterns, the Hibiscus Bag, so it was perfect to add to my January Sews. I can’t remember when I got the vinyl from, possibly Bare Buttler Crafts.
This weeks theme was about something that brings you or others joy. Well, this colour combo for this hoodie bought me so much joy!! I loved sewing it together and am SO happy with how it turned out. I wrote a review about which I’ll link below, but it is the Harper Hoodie from Sonia Estep Designs with fabrics from Sew Unique Fabrics
Week 5 was sew something with a rainbow in it. Well that was easy, Miss J LOVES rainbows, so I have no shortage of rainbow fabrics. I was also pattern testing the Sunflower Seam Elm Pullover at the time and found these scraps in my scrap bucket that fit so well. Love how it turned out and she absolutely loves it. Win for mummy!
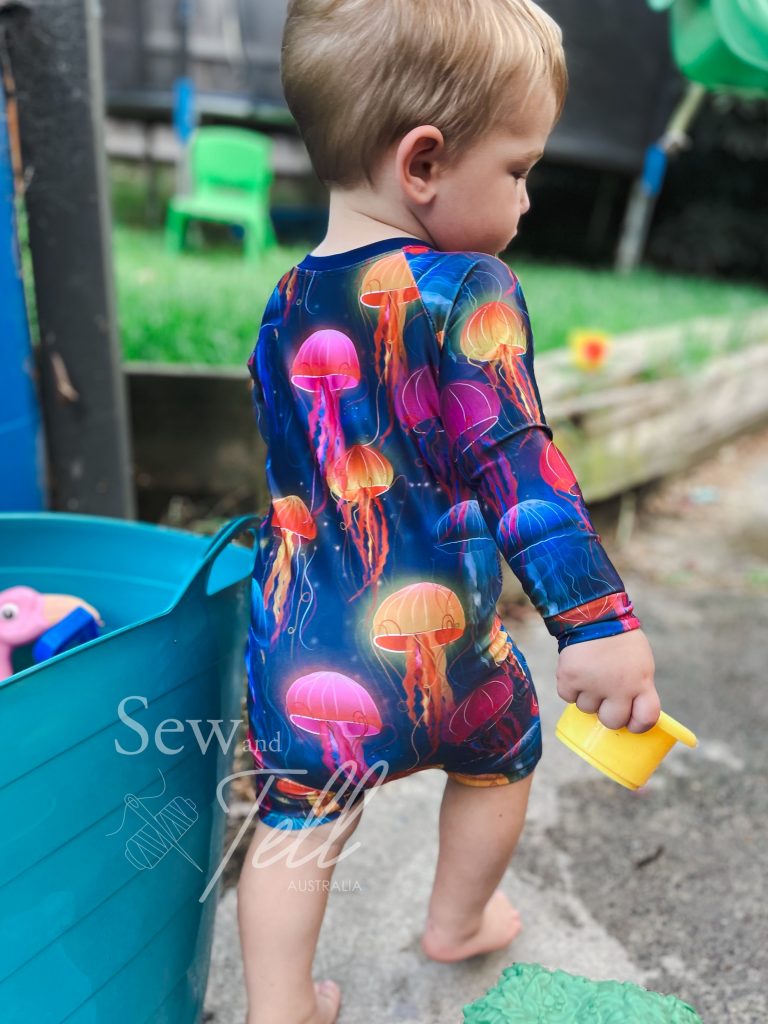
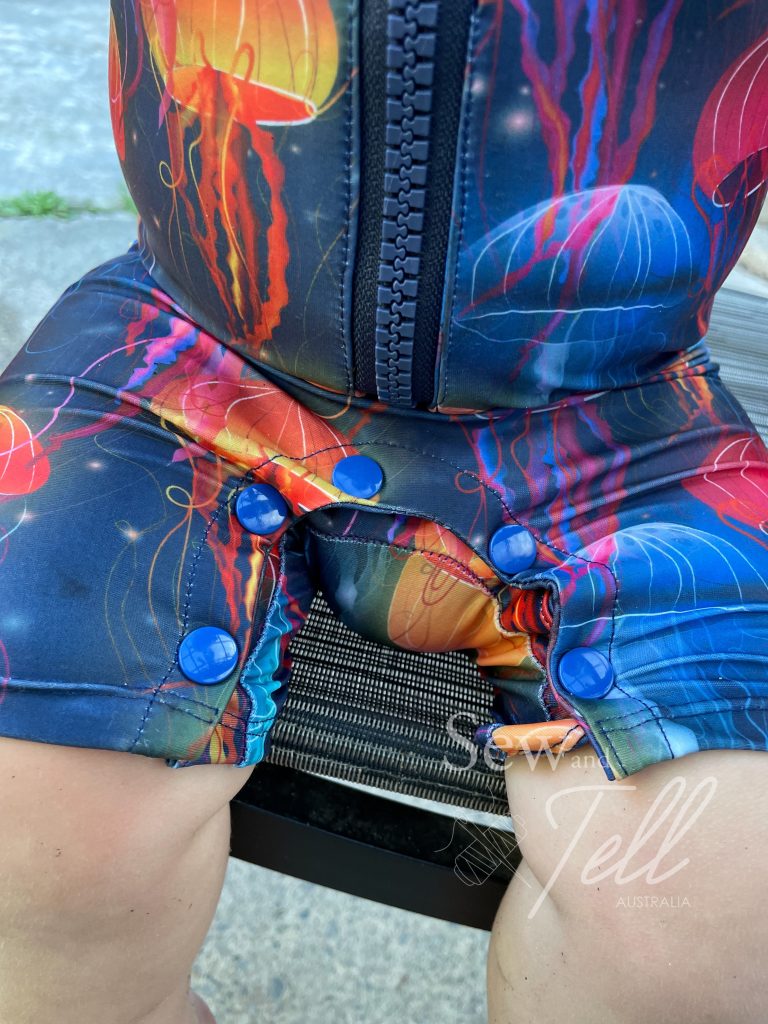
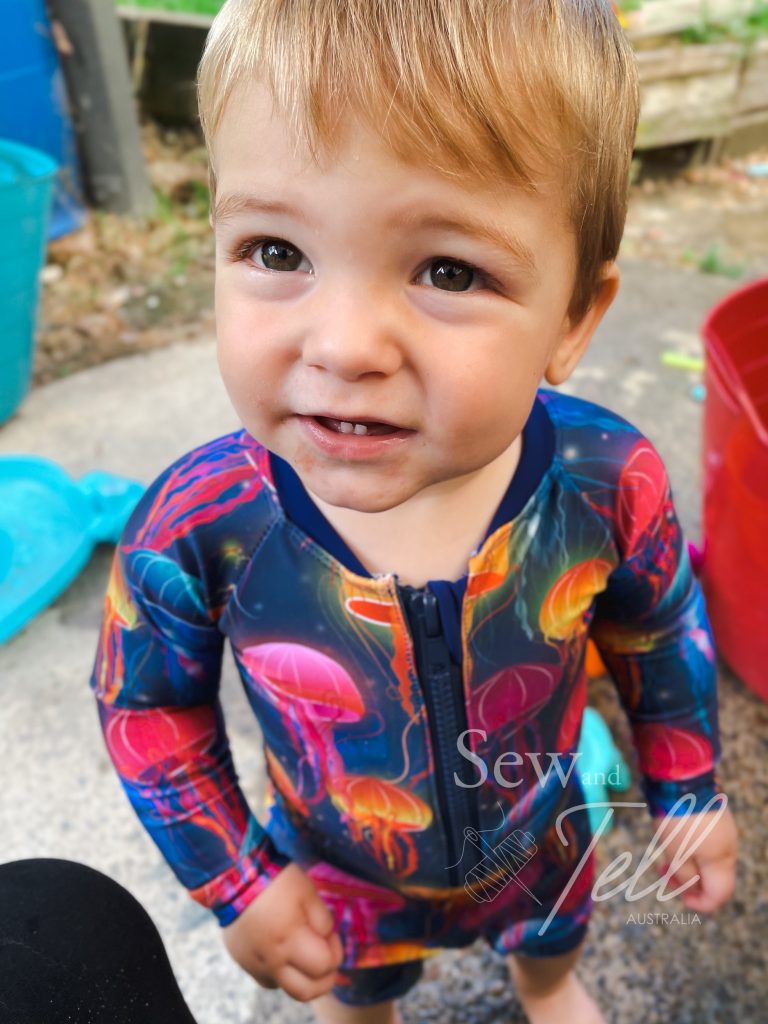
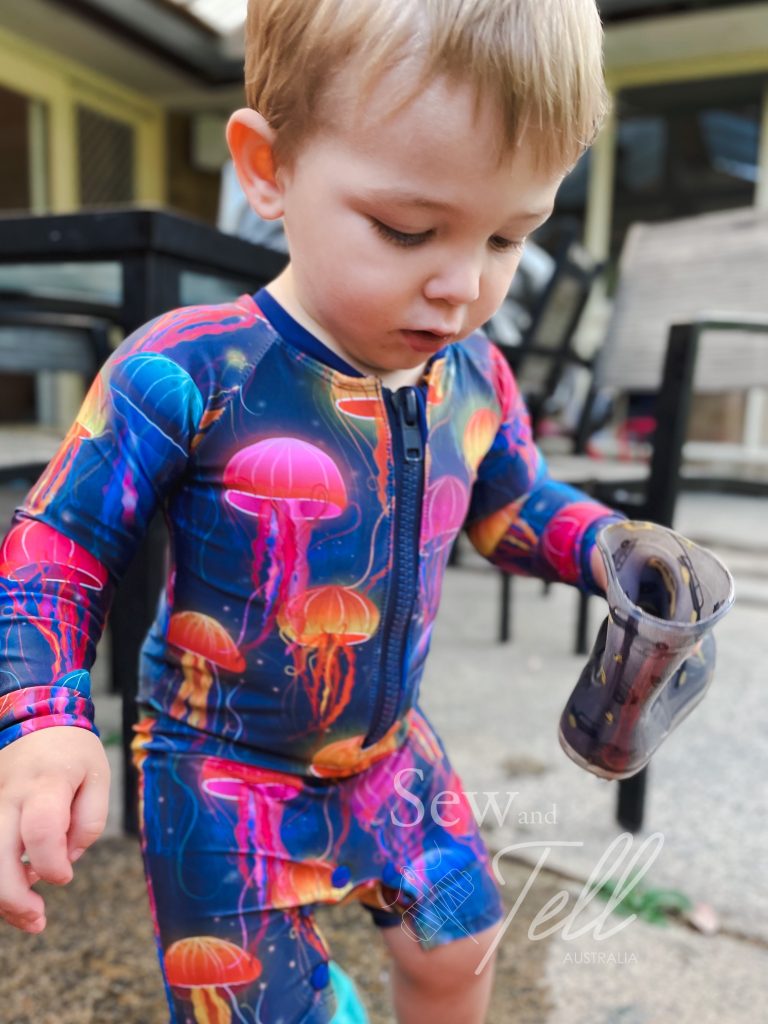
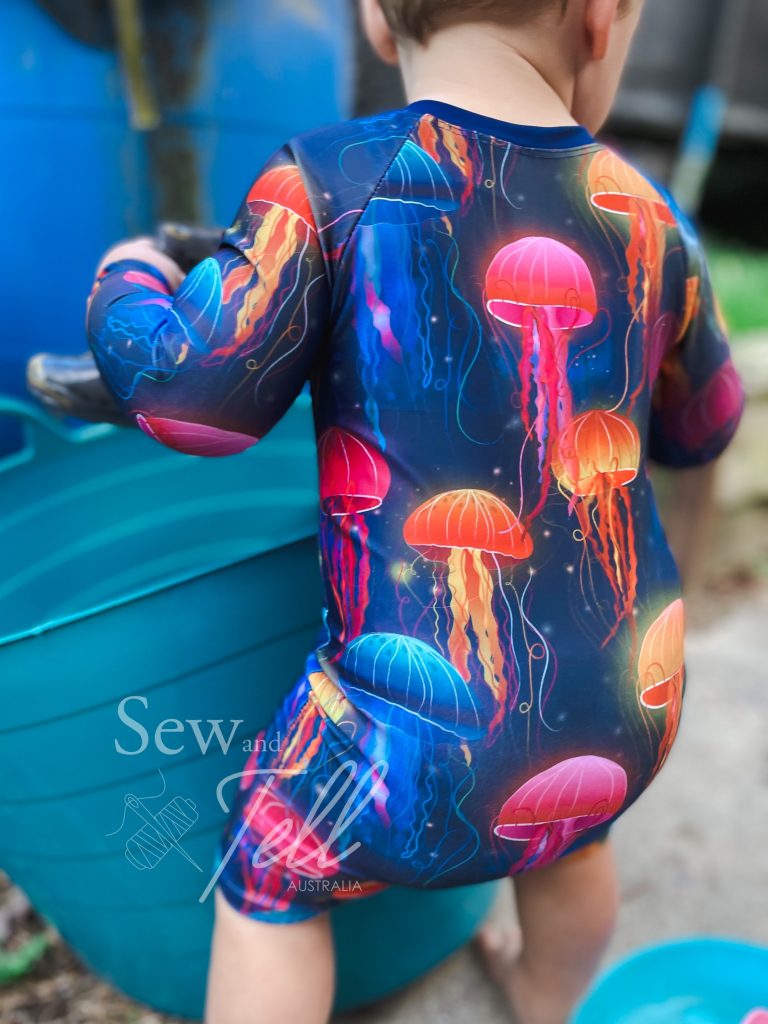
Pattern: Aloha Burn Blocker Designer: Peek a Boo Pattern Shop Fabrics: Swim Fabric from Sew Unique Fabrics Measurements: Chest: 21; Waist: 20″; Hips: 21″ Size made: 1 Adjustments: None Pros: LOVE the snap crotch option. Trying to change a nappy on a wet kid, who doesn’t want their nappy change is a challenge, so having the snap crotch makes a massive difference. Cons: I used a zip that was really too chunky. I also didn’t measure my son before I made it, so its a bit tighter
This was my first time sewing with swim, so I was a little nervous, but I’m so happy with how it turned out.
I used swim fabric from Sew Unique Fabrics as I was helping promote their latest release, SUF Ultimate. I am really impressed with the quality of their swim, it’s quite thick and has good coverage even when stretched over bottoms. The zip I got from Spotlight, its just a chunky closed end zipper.
The instructions were very clear and easy to follow. I would class this as an intermediate pattern, but as I say with most things, if you’re willing to give it a go, there is nothing stopping you.
I had a bit of trouble with the neckband and zipper, but I nearly always do. I need to practice some more as I often stuff it up 🙄 The snap placket along the crotch is definitely a favourite feature of mine. Trying to change a nappy of a kid in wet swim gear is a nightmare, so this is perfect!
All in all I will definitely be making more of these, I love that it goes to a kids size 12. So plenty more time to make for my boy, and my girl! The choice between long and short sleeve is also a bonus in our hot Australian sun. 10/10 for me.